
There’s nothing quite like the aroma of freshly baked sourdough bread wafting through your kitchen. Similarly, the satisfaction of slicing into a perfectly crusty loaf with that signature tangy flavor is unmatched. If you’ve been intimidated by sourdough baking, thinking it’s too complex or unpredictable, this sourdough bread recipe will change your mind completely.
Furthermore, this comprehensive guide provides you with a foolproof approach to creating homemade sourdough bread. As a result, you’ll achieve consistent, delicious results every single time. Whether you’re a complete beginner or someone who’s struggled with sourdough in the past, this easy sourdough bread recipe breaks down every step clearly. Additionally, it includes expert tips and troubleshooting advice that will have you baking like a pro.
Moreover, the secret to this recipe’s success lies in understanding the simple science behind fermentation. Meanwhile, you’ll follow time-tested techniques that professional bakers rely on. Consequently, you’ll learn not just how to make sourdough bread, but why each step matters. Therefore, you can adapt and succeed regardless of your kitchen conditions.
What Makes Sourdough Bread Special?
Sourdough bread represents one of humanity’s oldest forms of leavened bread. In fact, it dates back over 4,000 years to ancient Egypt. Unlike commercial yeast breads, tangy sourdough gets its distinctive flavor and rise from wild yeast and beneficial bacteria. These microorganisms are naturally present in flour and the environment.
Furthermore, this ancient fermentation process creates several unique qualities that set sourdough apart:
Complex Flavor Development: The long fermentation process allows wild yeast and lactic acid bacteria to create a symphony of flavors. As a result, you get everything from mild tanginess to deep, complex sourness. Additionally, this varies based on your starter and technique.
Superior Digestibility: The extended fermentation partially breaks down proteins and reduces phytic acid. Consequently, this makes nutrients more bioavailable. Moreover, the bread becomes easier to digest for many people.
Natural Preservation: The organic acids produced during fermentation act as natural preservatives. Therefore, sourdough bread has a longer shelf life than conventional breads.
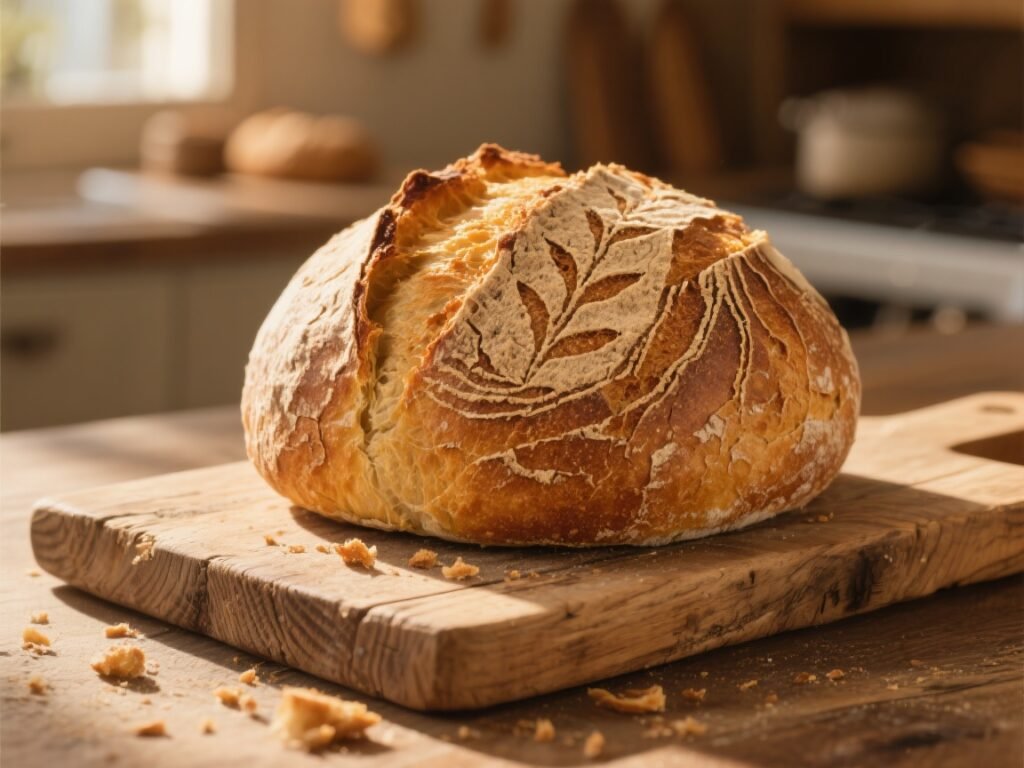
Artisanal Texture: Proper sourdough develops an open, irregular crumb structure with a crispy crust. Furthermore, this texture is impossible to replicate with commercial yeast alone.
The magic happens through a symbiotic relationship between wild yeast and lactic acid bacteria. Specifically, the yeast produces carbon dioxide for leavening. Meanwhile, the bacteria create the acids responsible for sourdough’s signature tang and improved keeping qualities.
Ingredients & Equipment
Essential Ingredients (Makes 1 Loaf)
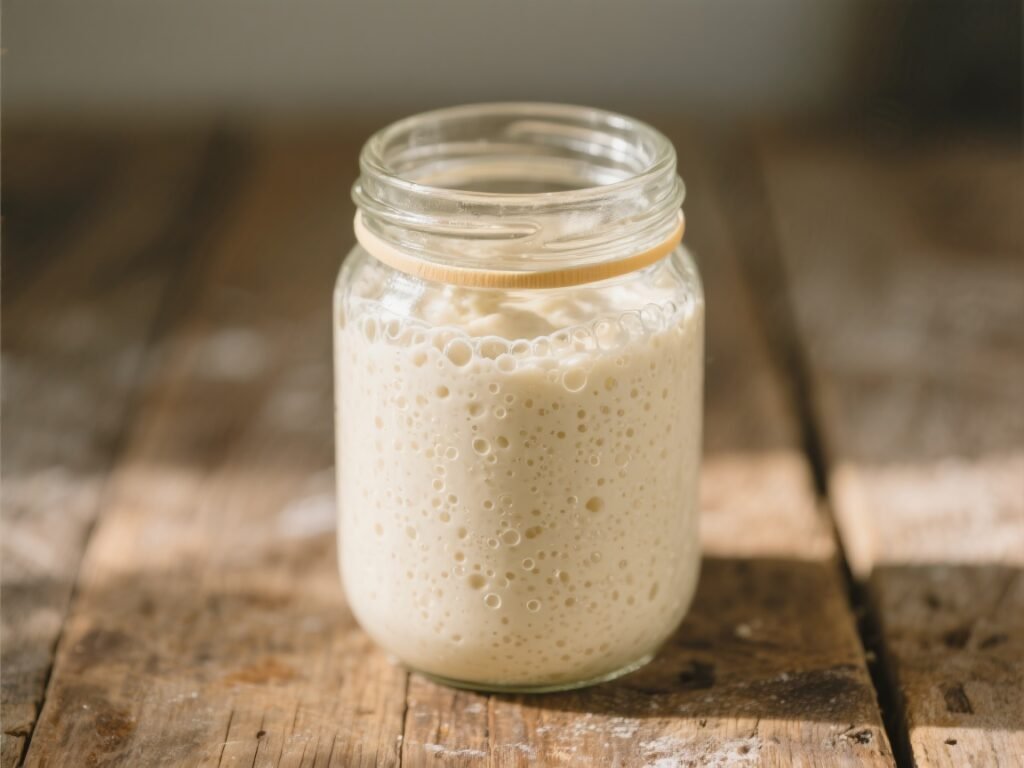
Active Sourdough Starter: 100g (½ cup) – This is your living culture. It should be fed 4-6 hours earlier until doubled and bubbly. Additionally, your sourdough starter should pass the float test. This means a spoonful floats in water and smells pleasantly tangy.
Warm Water: 350g (1⅔ cups) at 80°F/27°C – Temperature matters for optimal fermentation. Too hot kills yeast. On the other hand, too cold slows activity.
Bread Flour: 500g (4 cups) – High-protein bread flour (12-14% protein) provides the gluten structure needed for good rise and texture. All-purpose flour works but produces a slightly denser loaf.
Sea Salt: 10g (2 teaspoons) – Essential for flavor and gluten development. Use fine sea salt or kosher salt. However, avoid iodized table salt which can inhibit fermentation.
Must-Have Equipment for Beginners
Digital Kitchen Scale: Accuracy is crucial in sourdough baking. Furthermore, weight measurements ensure consistency that volume measurements simply can’t match.
Large Mixing Bowl: 3-6 quart capacity for mixing and bulk fermentation. Glass or stainless steel works best.
Danish Dough Whisk or Stiff Spatula: This makes mixing sticky sourdough dough much easier than a regular spoon.
Bench Scraper: Invaluable for handling dough, shaping, and keeping your work surface clean.
Proofing Basket (Banneton): A round rattan basket creates beautiful shape and pattern. Alternatively, line a bowl with a well-floured towel.
Dutch Oven: 3.2-6 quart cast iron pot with tight-fitting lid. This creates the steam environment essential for proper crust development.
Bread Lame or Sharp Blade: For scoring the dough before baking. A sharp razor blade or craft knife works if you don’t have a lame.
Parchment Paper: Makes transferring dough into the hot Dutch oven safe and easy.
Instant-Read Thermometer: Ensures your bread is fully baked. The internal temperature should reach 205°F.

Budget-Friendly Alternatives
Don’t let equipment costs stop you from starting your sourdough journey. Instead, you can substitute:
- A well-floured towel-lined bowl for a banneton
- Any heavy, oven-safe pot with lid for a Dutch oven
- A sharp knife for a bread lame (though control is more difficult)
- A wooden spoon for a dough whisk (requires more effort)
Step-by-Step Sourdough Bread Recipe
This easy sourdough bread recipe follows a proven timeline that works reliably for beginners. The process spans two days. However, most of the time is hands-off fermentation.
Day 1: Preparation and Initial Steps
Getting Your Starter Ready
Step 1: Feed Your Starter (4-6 hours before mixing)
Feed your sourdough starter with equal parts flour and water (50g each) plus 50g of existing starter. It should double in size and become bubbly and active. This is crucial because weak starter equals poor bread.
Mixing and Autolyse
Step 2: Mix and Autolyse (1 hour)
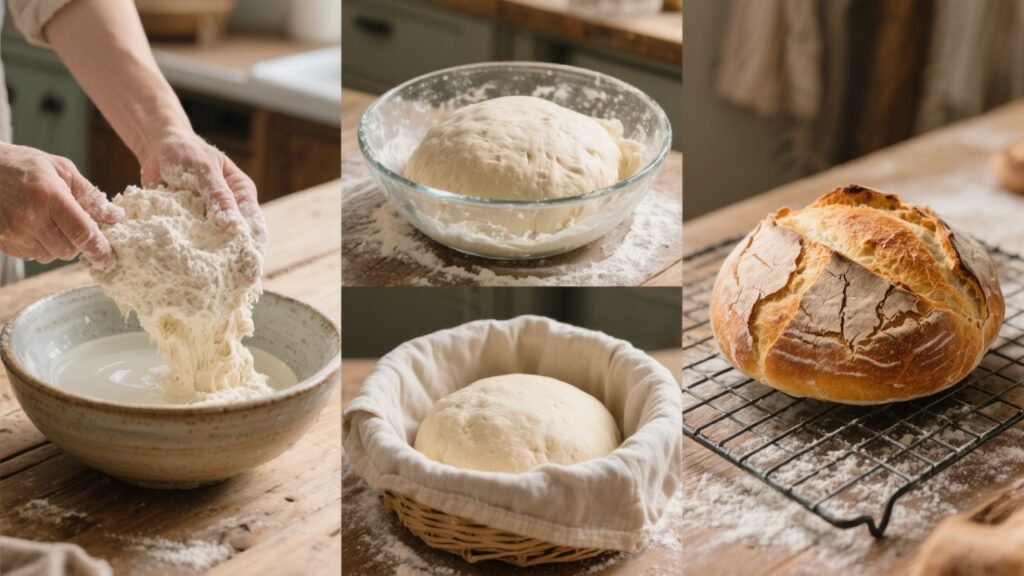
In your large bowl, combine 100g active starter with 350g warm water. Stir until milky. Next, add 500g bread flour and 10g salt. Mix with your dough whisk until no dry patches remain. The dough will look shaggy and rough – this is normal. Cover and rest for 60 minutes. This autolyse period allows flour to fully hydrate. Additionally, it begins gluten development.
Day 1: Building Strength and Fermentation
Developing the Dough
Step 3: Stretch and Folds (2 hours total)
With wet hands (this prevents sticking), grab one side of the dough. Stretch it up until you feel resistance. Then fold it over to the opposite side. Rotate the bowl 90° and repeat until you’ve completed four folds. Cover and rest 30 minutes.
Subsequently, repeat this process three more times over 2 hours (4 rounds total). You’ll notice the dough becoming smoother and stronger with each round.
Bulk Fermentation Process
Step 4: Bulk Fermentation (6-8 hours)
After your final fold, cover the dough and let it ferment at room temperature (75°F ideal). However, watch for visual cues rather than relying solely on time. The dough should increase by 50-75%. Additionally, it should become puffy with visible bubbles and jiggle like gelatin when gently shaken. This is where patience pays off because proper bulk fermentation is key to great sourdough.
Shaping and Cold Proof
Step 5: Shape and Cold Proof (12-24 hours)
Turn the dough onto a lightly floured surface. Pre-shape into a round and let rest 15 minutes. For final shaping, flatten into a rectangle. Then fold the long edges into the center and roll up from the short end.
Next, cup your hands around the dough and drag it against the work surface to create tension. Place seam-side up in your banneton. Cover with plastic wrap and refrigerate 12-24 hours.
Day 2: Baking Your Masterpiece
Preparation for Baking
Step 6: Preheat and Prepare (1 hour before baking)
Place your empty Dutch oven with lid in a cold oven. Preheat to 475°F (246°C) for at least 30 minutes. This ensures even heat distribution.
The Final Baking Steps
Step 7: Score and Bake
Turn your dough out onto parchment paper, seam-side down. Using your lame or sharp blade, make a decisive cut ¼ to ½ inch deep across the surface. Lift the parchment with dough into the hot Dutch oven. Cover immediately and bake for 25 minutes.
Subsequently, remove the lid and reduce temperature to 450°F (232°C). Bake 20-25 minutes more until deep golden brown. The internal temperature should reach 205°F (96°C).
Step 8: Cool and Enjoy
Transfer to a cooling rack. Resist the urge to slice for at least 1-2 hours. The interior continues cooking from residual heat. Moreover, proper cooling prevents a gummy texture.
Recipe Card
SOURDOUGH BREAD RECIPE
Prep: 30 minutes | Fermentation: 18-24 hours | Bake: 50 minutes | Serves: 8-10
Ingredients:
- 100g active sourdough starter
- 350g warm water (80°F)
- 500g bread flour
- 10g sea salt
Instructions:
- Feed starter 4-6 hours before mixing
- Combine starter and water, add flour and salt
- Autolyse 1 hour
- Perform 4 rounds of stretch and folds (30 min apart)
- Bulk ferment 6-8 hours until 75% larger
- Shape and cold proof 12-24 hours
- Bake in preheated Dutch oven: 25 min covered at 475°F, then 20-25 min uncovered at 450°F
- Cool 2 hours before slicing
Tips for Success & Common Mistakes
Expert Tips for Perfect Results
Temperature is Everything: Keep your dough at 75-78°F during bulk fermentation for predictable timing. Use the oven with just the light on if your kitchen is cool.
Trust Visual Cues Over Time: Fermentation speed varies with temperature, humidity, and starter strength. Therefore, look for the 75% size increase and jiggly texture rather than watching the clock.
Develop Gluten Properly: Those stretch and folds aren’t optional. They build the structure that traps gas and creates good rise. You should feel the dough becoming stronger and more elastic.
Score with Confidence: Use a sharp blade at a 30-45° angle and make quick, decisive cuts. Hesitation leads to dragging and poor ear development.
Common Mistakes to Avoid
Using Weak Starter: The most common cause of dense, flat bread is using starter that isn’t at peak activity. Your starter should double in 4-6 hours after feeding. Additionally, it should pass the float test.
Over or Under-Fermentation: Under-fermented dough produces dense bread with tight crumb. On the other hand, over-fermented dough becomes slack and spreads instead of rising. Use the poke test – properly proofed dough springs back slowly but incompletely.
Adding Too Much Flour: Resist the urge to add flour when the dough feels sticky. Sourdough is naturally tacky. Instead, use wet hands rather than more flour.
Cutting Too Soon: Slicing before the bread has cooled completely results in gummy, wet crumb. The interior needs time to set properly.
Inconsistent Measurements: Always use a scale for accuracy. Even small variations in hydration significantly affect the final result.
The Science of Tangy Sourdough Bread
Understanding the science behind your tangy sourdough helps you control flavor and improve your results. The signature sourness comes from two main organic acids produced during fermentation.
Lactic Acid: Created by homofermentative bacteria, this produces a mild, yogurt-like tanginess. Furthermore, warmer temperatures and higher hydration favor lactic acid production.
Acetic Acid: Produced by heterofermentative bacteria, this creates the sharper, vinegar-like sourness. In contrast, cooler temperatures, lower hydration, and longer fermentation times increase acetic acid.
The wild yeast in your starter converts sugars from flour into carbon dioxide and ethanol. The carbon dioxide makes the bread rise. Meanwhile, the ethanol adds subtle fruity notes and evaporates during baking. Simultaneously, the bacteria create the acids that give sourdough its keeping qualities and distinctive flavor.
Controlling Sourness: Want more tang? Use cooler fermentation temperatures and longer cold proofing. Prefer milder flavor? Keep fermentation warmer and shorter. Additionally, use your starter at peak activity rather than when it’s declining.
The long fermentation also breaks down proteins and reduces anti-nutrients like phytic acid. As a result, the bread becomes more digestible and nutritious than quick-rise breads.
Caring for Your Sourdough Bread Starter
Your sourdough starter is a living culture that requires regular care. However, it’s more resilient than many beginners think.
Daily Maintenance
Feeding Ratio: Use 1:1:1 by weight (starter:flour:water). For example, 50g starter + 50g flour + 50g water.
Room Temperature Storage: Feed every 12-24 hours if keeping at room temperature. In warm weather, you may need twice-daily feedings.
Signs of Readiness: Your starter is ready to use when it doubles in size 4-8 hours after feeding. Additionally, it should have a domed surface covered in bubbles and pass the float test.
Refrigerated Storage
Weekly Feeding: If baking less frequently, store your starter in the refrigerator and feed weekly.
Pre-Baking Preparation: Remove from fridge, feed, and let become active (2-12 hours) before using in bread.
Troubleshooting Starter Issues
Hooch (Dark Liquid): This alcoholic byproduct indicates your starter is hungry. Stir it back in or pour it off. Then feed normally.
Slow Activity: Try warmer temperatures (75-80°F), more frequent feeding, or switching to unbleached flour.
Excessive Sourness: Increase feeding frequency and discard a larger portion before feeding to dilute accumulated acids.
No Rise: Check your water (chlorinated water can inhibit growth). Also, ensure proper ratios and verify your flour isn’t bleached.
Sourdough Bread FAQs
Q: How long does it take to make sourdough bread?
A: The active work time is about 30 minutes. However, the process spans 18-24 hours including fermentation. Most of this is hands-off waiting time.
Q: Can I use all-purpose flour instead of bread flour?
A: Yes, but bread flour’s higher protein content (12-14%) provides better structure and rise. All-purpose flour (10-12% protein) works but may produce a slightly denser loaf.
Q: Why is my sourdough bread not sour enough?
A: Increase sourness by using cooler fermentation temperatures, extending cold proofing time, or using starter that’s past its peak activity. The bacteria that create acids are more active in cooler conditions.
Q: Can I speed up the fermentation process?
A: While you can use warmer temperatures to speed fermentation, slower fermentation develops better flavor. The cold proof step can be shortened to 12 hours minimum. However, 24 hours is ideal.
Q: What if I don’t have a Dutch oven?
A: Any heavy, oven-safe pot with a tight-fitting lid works. You can also bake on a preheated baking stone with a pan of boiling water for steam. However, results may vary.
Q: How do I know when bulk fermentation is complete?
A: Look for 50-75% size increase, visible bubbles throughout, and a jiggly texture when gently shaken. The poke test works too – properly fermented dough springs back slowly.
Q: Can I make this recipe without a scale?
A: While possible, weight measurements are crucial for consistent results. Cup measurements can vary significantly and lead to unpredictable outcomes.
Serving & Storage Suggestions
Serving Your Homemade Sourdough Bread
Fresh from the Oven: Allow to cool completely (1-2 hours) before slicing. Serve thick slices with butter and sea salt to appreciate the pure flavor.
Toast Perfection: Day-old sourdough makes exceptional toast. The slight staleness actually improves toasting quality. As a result, it creates a crispy exterior while maintaining a tender interior.
Gourmet Applications: Use as a base for avocado toast. Additionally, pair with aged cheeses and charcuterie, or create the ultimate grilled cheese sandwich.
Storage Methods
Short-term (1-3 days): Store cut-side down on a cutting board covered with a clean kitchen towel. This maintains crust crispness while preventing the cut surface from drying out.
Medium-term (3-7 days): Wrap in parchment paper or store in a bread box. However, avoid plastic bags for whole loaves as they soften the crust.
Long-term (up to 3 months): Slice completely and freeze in portions. Toast directly from frozen or thaw individual slices as needed.
Reviving Day-Old Sourdough Bread
Refresh a whole loaf by lightly misting the exterior with water. Then heat in a 350°F oven for 10-15 minutes. The crust will re-crisp and the interior will warm through beautifully.
Conclusion
Mastering this sourdough bread recipe opens the door to a rewarding baking journey. Furthermore, it connects you with centuries of bread-making tradition. The combination of simple ingredients, time-tested techniques, and your growing understanding of fermentation will produce homemade sourdough bread. As a result, your bread will rival any artisan bakery.
Remember that sourdough baking is both an art and a science. Each loaf teaches you something new about your starter, your environment, and your technique. Don’t be discouraged if your first few attempts aren’t perfect. Even experienced bakers continue learning and refining their approach.
The key to success lies in patience, observation, and consistent practice. Keep detailed notes about timing, temperatures, and results. Soon you’ll develop an intuitive understanding of how your dough should look and feel at each stage.
Ready to start your sourdough journey? Begin by establishing or obtaining a healthy starter. Next, gather your essential tools and commit to the process. Your kitchen will soon be filled with the incredible aroma of fresh tangy sourdough.
Happy baking, and welcome to the wonderful world of sourdough!
Hello!